If there are pretzel crumbs all over this post when you open it, I apologize. I was starving.
So just in time for some freezing cold weather in Pittsburgh, here is the how-to on how to make the sweater skirts I made for me and my girls for
our NYC trip.
What I like about these skirts is that they are very forgiving in the sewing skills department. I know sewing can be daunting to some people but these go together super easy. You will spend more time trying to pick out your sweaters at the Goodwill then you will sewing these!
First off, here is the inspiration for the knock off.

I found these in the Uncommon Goods catalog for $54. I used 8 sweaters and made 6 skirts for $37!!!! I think THAT is Uncommonly Good.
SO now here is the down low on how to make these:
What you need:
old cotton sweaters in complementary color palatte, solid and pattern mix is interesting
2 inch non-rolling elastic
sewing machine
contrasting thread
black thread
First I only made 8 panel skirts not 12 as above. I will show you how to modify and calculate your panels below.
If you are making matching sweaters, go to the XL, XXL sections as you will get more fabric for your buck. If making a one of a kind than use M or L sizes depending on the number of panels.
Try to pick sweaters that have the same "weight" and tightness (don't know if that is a word) to the knit. I used only cotton sweaters because if you mix wool and cotton and rayon, you will have a very strange looking skirt after the first time you wash it (especially if you forget and wash in hot water, your wool will shrink and there goes all your hard work!)
Make your panel template or pattern:

Measure your waist or slightly below depending on wear you want the skirt to sit. Divide that number by the number of panels you are going to have in your skirt. The number will be used to make the top of your panel template.
I originally made the bottom of my panel template only 2" bigger than the top measure for the blue set of skirts. It was okay but I think a more "swingy" skirt was good so for the candy cane skirts, I made the bottom measurement 4" larger than the top measurement
 |
| Blue skirt template as compared with the candy cane template. |
Measure how long you want the skirt to be. Subtract 2" from that measure. It will be made up when you sew on your elastic waist band.
Cut out your panels:
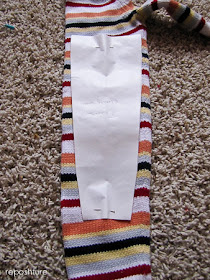
Pin it to your sweater and cut out. Cut through both layers if repeating the panel in the skirt and only one if using only once. Here I used the sleeve. Remember to use the edge of the sleeve or the hem as well if it is interesting.
See how I used the pocket in this skirt. The front and back of the skirt was made up of 4 panels each: turquoise, stripe, amethyst, and lavender
 |
| Typically in sewing you sew right sides together but with these skirts you sew wrong sides together. The top with seam is wrong side and the bottom is the right side. I am not trying to talk down to people I just want to be clear to anyone sewing for the first time |
 |
Lay out your panels until they are how you like them. Once you get your pattern, lay out the back panels in the same way. Sew two panels at a time, wrong sides touching. I did not pin these together because I tend to wing it with stretchy fabrics.
Sew your skirt!!
Thread your sewing machine, or Serger, with a contrasting thread. Using a Serger will completely cover the edge, the sewing machine in zigzag will create a fringe once it is washed. You need to choose the zig zag stitch and then the width of the zigzag. See below.
 |
The sweater edge should line up with the edge of the presser foot. See below.
 |
| Place your fabric under the presser foot. Make sure to put the stretchier fabric underneath facing the feed dog. The feed dog is the jagged looking thing under the presser foot. It helps gather the bottom material for you therefore it will help the stretchier material not wind up being 2" longer than the top panel when you are done sewing. Sew all panels starting at the waist. You can also start from the hem but whichever way you choose, just sew all panels the same way. Now sew slow but steady. You DO NOT have to be perfectly straight (but it helps.) |
 |
| This is what each set of panels look like afterwards |
 |
| Here it is up close. |
It will ripple, it is supposed to so don't panic. Once you have the front panels sewn, do the same order for the back panels. Then sew front to back at the sides. If you sewed waist to hem and your hemline is uneven, cut it now to make it even. If you sewed hem to waist and the waistline edge is uneven, cut the uneven parts to even it up.
Place the now even hemline under the presser foot and zigzag the edge all the way around to finish it. Again try to stay straight as you can.
When you come to a vertical seam, like above, fold it towards you and let it flow under the presser foot.
Again with the ripples. All good.
Take your 2" elastic and measure at the same place you want the skirt to sit. Allow an overlap of 1/2" and cut. Sew the cut ends together using a straight stitch and about 1/4" from the edge. Change your thread to black on you machine.


Open the seam and sew it flat using a zigzag stitch. Left is inside and right is the outside. They are two different colors to show the difference.


Pin the right side of the elastic to the right side of the waistline, matching edges. Pin once in front, once in back and on either side. Now pin the rest of the material easing any extra material between the pinned segments.
Front of the skirt
Wrong side of the skirt
Another view. I wasn't so good at keeping the edges exactly even. This was my 6th skirt and I was a little buggy by then.
Line up your material with the edge of the presser foot and sew using a zigzag stitch. Again make sure that the sweater material is touching the feed dog and the elastic is facing the presser foot.
Here is is finished. I usually run another row of stitching to secure it. Don't want an America's Funniest Home Video moment.
Right side view of the finished waistline. See how it fringes and the ripples relax once you wash it. See, I told you not to panic.
It took me an hour for each skirt, and that includes cutting the panels!
In case you are wondering why none of the fabrics match from picture to picture, I forgot to take pics when I made these so I staged these photos to show you all how. I know you'll forgive me when you are prancing around in your new sweater skirt that YOU sewed! Good job being fearless and trying something new!!! I am super proud of you and you should be proud of you too!
If you have any questions or need help with this project, pleeeeze do not hesitate to email me. I would love to hear from you.
Linking arms with these blissfully beautiful bloggers:

,

,

, ,

,
,


Always being renewed,


