August 30, 2012

Three-Toned Vanity

You've seen all the two-toned furniture all over blogland and Pinterest, right? Well, I am taking it to the next level.....

Three-toned furniture! Yep, I went there. Now who's gonna follow me on this new adventure?
The different woods on this beauty were getting lost in the brownness of it.

Yes I ALMOST forgot to take the before picture! I wanted to try to stain the piece so the veneers would show up better but because one is light and the other is dark there would be no way either would contrast enough so, paint it is. 

I picked a paint called Cotton Knit from Behr and mixed it into my chalkpaint recipe and got to work. Cotton Knit is a very light tan, bordering on dark cream  or maybe ecru. But when I mixed it with the POP, it took on a more creamy off white. I actually like it.


The Fiddes and Son light wax deepened the tan and you know I love contrast. I did not touch the mirror because really there is just a strip of wood that could be painted behind the mirror and I don't think that would have added a thing to the final product. 

What do you think?
I am clearly not trying to focus on the brick or the downspout but that is what I got. I was trying to show you the cool Walnut burl veneer on the top of the mirror, Well, I do enjoy all things vintage, even if the old and vintage are vines. 

Some gold detailing. This is a pain in the buttski to add but I always love the detail after it's done.

Finally a good shot to show the two contrasting veneers. You can see on the bottom of the mirror that they added both types of veneers here as well. Love old things. They know how to add details and how to build furniture. Can you imagine what this would look like today? 
Bad particle board with fake veneers laminates. Meh.
Old things rock.
So does the new Three-toned finish trend I am starting.....  

Always being renewed,

August 28, 2012

Communion Table shelf Winner #2!

 I have officially begun to walk in Blogland, well toddle a little. 
Yes, my little blog is officially 1years old today!

It doesn't seem that long and yet it seems like forever.

In honor of my birthday and my 1 year blog birthday, I had made two towel bar shelves from a communion table and decided to give them away!

So today is the day for the second shelf to be given way......

The official giveaway name bowl.... and the winner is.......

Oh, sorry, let me get my glasses......


And her winning rhyme was

Happy Birthday a day late Kimmie! Your card's in the mail!

I had to construct this rhyme
So as not to spend a dime
on that pretty little shelf
I should've made myself
But Kim risked the lightening
& my house could use some brightening
I swear I'll make my own
when these gosh darn kids are grown!


I am super happy because Susan is one of my bestest friends from Grad School. I did not purposefully pick her name. I really mixed up the names and then picked after several minutes swishing my hands around in the bowl.

When I saw her name I might have said something like
"No freakin' way!"


Thank you to each and everyone of you who participated in my first giveaway. I had so much fun doing this!

  you people can rock a serious rhyme so I am gonna try my hand at it to thank y'all....

I wish I had skills to match your word making trills
You make me hang my head in shame
But I love each of you
 And all the things you say and do
So I am one blessed, blogging dame!

XOXOXOXO


Always being renewed,

August 27, 2012

Reverse Stenciling Technique

I thought I'd show you a quick table re-do and then realized I did not take any before pictures. 
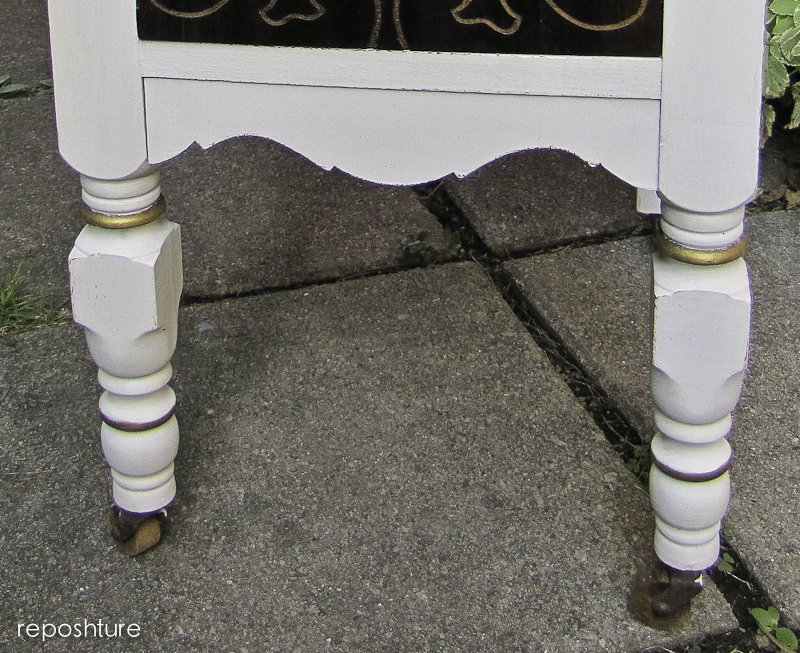
So this is just an after of the little table. 
But I am going to tell you how to do a cool technique called reverse stenciling.
Reverse stenciling is when you mask off something you DO NOT want to paint.

Here is an example of a bureau I did with cherry blossoms.

It started out like this. Some really beautiful wood but not in great shape. I am a big proponent of trying to highlight a furnitures best features in different ways. Try not painting the cool details to actually make them pop more. See my round table as an example of this. So this had some beautiful wood that I wanted to show through so I decided that the best way to highlight this feature was to mask off portions of it. Then choose a paint color that would contrast nicely with the wood.

How did I mask off this detailed design. No I did not spend hours cutting Frog Tape into branches.
I found a gigantic wall decal of a cherry blossom tree. 
I pieced together branches and flowers until I was happy with the arrangement. If you look closely, you can see the plastic edge of the decal. This would not have allowed for a crisp design. Everything would have had a rounded edge and not looked very much like a branch so I painstakingly cut away all the clear plastic with my X-acto knife. Make sure you use a sharp new blade and you will make quick work of it. 
(I did look at this before painting it  and thought "I like this gold on the wood. Another dresser and another time will get this technique!")


I also cut into the wood a little in parts to give it some detail and look more layered. I added the flower centers by hand to minimize the chance of bleeding if I had tried to cut them out. Not worth it. I think I can paint an oval free-hand.

The turquoise and the brown look great together. Then you can further highlight some of the pieces good bones with some glaze or antiquing if you like.

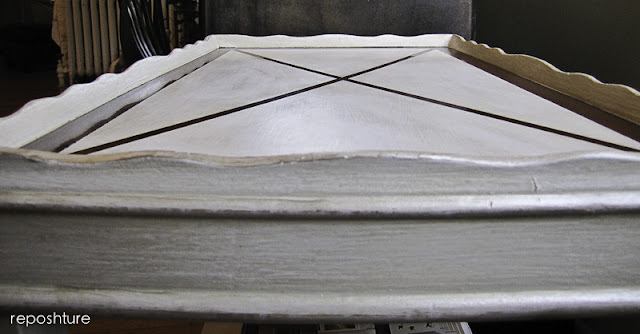
My little table got the same technique because the top had some pretty wood and I thought it would look good shiny while the rest of the paint was matte. 
I just masked off the perimeter and then used a smaller masking tape to do the "X" and then painted it. 
You can use a wall decal like the bureau, plain old frog tape or draw a picture on contact paper, cut it out and apply. The important part is to burnish it very well with a credit card edge to seal the edges to the wood so you get minimal to no seepage under the tape/contact paper. When you start your first coat of paint, start on the contact paper/tape and go out. If you brush the paint from the outside in, you will have a greater chance of pushing the paint under the edge.Your second coat can go any which way as you have already created a seal with the first coat. 

I wanted the shelf to have the same "X" but it  did not have that same beautiful wood on it so I had to paint it. 

I used my same homemade chalkpaint recipe that I used on the cherry blossom bureau. It is so simple. Mark on a mason jar 4 equal marks with a sharpie marker. Fill the jar up to half the first 1/4 mark with Plaster of Paris (POP) and mix thoroughly with water. Then add your paint to the top mark and mix again, thoroughly. Add water as needed to keep it the right consistency as  you paint. I used a 2 oz. sample jar and had so much left over I am using it on a large vanity. And that still has paint leftover! Can you say economical? 

I like the mason jar because it is airtight and air is the enemy of POP and paint in general. I also stir it about every 20 minutes just to keep it uniform. Wipe your rim of the jar before closing and store upside down! Creates an even better airtight seal for longer shelf life. Do the same with your paint cans and these will last longer as well.

This was after I had waxed it so the wood wasn't shiny yet.


When you use chalkpiant make sure you give it a little sanding with 280 or 320 grit sand paper to smooth out the surface. You can distress then harder if you want but you will have a smoother surface to apply your wax on and you will use less wax that way.

Yes I am not a perfect painter. I just cleaned up this edge with a dentist tool that I have. DO NOT ask me where I got it. I have no idea how it came into my possession. But my teeth and my furniture both look squeaky clean!

All shined up.  Ohhhhh, how I love contrast

I highlighted the wavy top and the details of the top with gold glaze and then waxed it using Fiddes and Sons wax. Amazing stuff! I had only ordered the light and I wanted some antiquing so I put some on a Styrofoam plate and added a bit of stain I had already. Worked great! If it was too heavy in places adding some clear over top took it down a notch with no problem.

Using the dark wax over the gold definitely took the edge off of the gold but I like that it now looks more subtle and worn and not so "I just applied gold glaze to the edge!"

I hope you will brave the stenciling world and be a rebel.....
Go reverse!

Always being renewed,


Please see the link party page to see where I link arms with those blissfully beautiful bloggers that host every week. So gracious they are along with these other sweet ladies! Todays Creative Blog vif187 all crafts Homemade Projects ~ Add Yours! {5/1} Home Stories A2Z  
We Would Love For You To Join Us Each Wednesday... southern hospitality

My Repurposed Life My Uncommon Slice of Suburbialollipops

Funky Junk's Saturday Nite Special

August 25, 2012

Another Booth Update

My booth updates are starting to sound like labor contractions. An update every 10 minutes!
Sorry if these are boring you but I am having a blast fixing it up, so bear with me. And they are from my iPhone again so really bear with me. This is all to have you come visit  me in person, then things won't look so grainy. Well, my laugh lines will still be there in all their technicolor goodness!

My old garage door just keeps giving back to me. If you remember, I had made a long outdoor "sofa bench" out of 2 of the wood sections. Well, I still had the glass window section that I knew I could use somehow.

What do you think?

I broke all the windows (it felt so good, like it was mischief night before Halloween!) and then scraped all the loose paint.  I have saved the hinges, lock brace, and rollers because I love industrial things and because I knew I would use them eventually. Well, eventually came yesterday!

I wanted to hang a pretty wreath on the door to show how something like a garage door can be used in your home.
 I like that I can change up the display too. I could hang a small wreath  in each window or I thought I might string wire or twine across each window and attach B&W photos. 
You could attach old heater grates to the rungs and have a shelving unit.
Possibilities are endless!


 I think I should have hung the wreath from the second "rung" but it was too late, I had already lugged it down to the shop.
I measured the diameter of the roller glide and then used a wood bit that was a little bit smaller. (Hee, Hee). De-grease it before hanging anything on it. I just used dish washing liquid and a scrubber and it was great.  Then I just hammered the roller into the hole and Badda Bing!
The wreath is one of those coffee filter jobs all over the Internet and 2.5 yards of silk ribbon. 

 Loves me some Industrial Chic.

Always being renewed,

August 22, 2012

Sold and a booth update

Okay so this is nothing great but I thought I'd show you how I covered up that peg board on the wall of my little booth.

Remember this?

Now it looks like this so far. 

I forgot my "real" camera so had to use the iPhone. It gives you the idea. I used a 12x15 drop cloth ripped into 4 sections. Not sure why I thought I needed one 15 feet long but it puddles nicely =0)


I have to get my craft on so I can pretty it up but I think this makes a world of difference.

And guess what......
"Paid"

Always being renewed,

LinkWithin

Related Posts Plugin for WordPress, Blogger...