July 11, 2012

Garage Door...Bench


So what did my old garage door turn into? 

If you guessed a bench than you win the prize!
Except I don't have a prize..... you'll just have to live with the satisfaction of knowing you are so smart and creative! And you were right. And we all know how much we all love being right.....Right? 

Now let's see what's left (Wahaha) of my garage doors!
I took two of the middle sections and used the better one for the top and the lesser one for the supports.


Because it was quite heavy, I added a support in the middle and braced the two ends with some high quality cabinet grade wood we had from one of our rentals. I was not in love with the gray but wasn't sure I wanted to tackle making her nekkid. But when I saw my friend Amy's window sill she had just striped using a heat gun, I quickly changed my mind. She let me borrow it and I was not disappointed. I  was not concerned with getting it down to the bare wood. I wanted it to be a little rustic and loved.

 I also know these pillows are not vintage enough but I'm working on it and I will show you what I came up with after we finish our annual summer party this weekend and we return from vacation the next week! THese pillows only cost $3 each at the local thrift. So I got all 6 because I know when you find good pillows and in a large matching quantity like this, who cares what they look like because you can always recover them in the fabric of your choice.   Just like matching lamps at the thrift. DO NOT PASS THEM UP! or you will be seeing them on someone else's blog and you will kick yourself for  being a DIY poser.

 This was supposed to be used for my super cool, huge farmhouse table I scored on the trash. (I was stalking that house for days, just waiting for the moment they took it to the curb. The moment it happened I grabbed my amazing son and we took the dolly down two blocks,  wrestled it on and wheeled it back up our alley and into the back yard!) Ya' know, with me, you do not get boring.

 When I put in place by the table it looked like a beast! Too high, too long, too everything.

Sigh.

I thought about cutting off the two end panels, or just making the supports shorter but have you read my post on my 4th of July dresses recently? Patience Kimmy-san.......something will come to you.....


As I was working on this, we had ripped out all of my plants along this wall and moved them in preparation for a deck.....which we then decided to postpone until next year. So this wall actually started to look like a great place for a vintage, reclaimed wood, garage door couch!

I love it. It looks and feels like it belongs. It is amazingly comfortable to sit on and my girls have already started to enjoy it at night while waiting for the fireflies to come a-knocking.


So, did I do good?

Always being renewed,


Please see the link party page to see where I link arms with those blissfully beautiful bloggers that host every week. So gracious they are along with these other sweet ladies! Todays Creative Blog vif187 all crafts Homemade Projects ~ Add Yours! {5/1} Home Stories A2Z  
We Would Love For You To Join Us Each Wednesday... 

My Repurposed Life My Uncommon Slice of Suburbialollipops


July 10, 2012

T-shirt Halter Dress

As usual I am late for the Holidays. We always make a 4th of July T-shirt. We have used freezer paper to make a stencil, pasta to make fireworks stamps, and also just free- handed the painting. Before blogging, I would make them a week ahead. After blogging, two days before! So now you will have a whole year to practice and make a halter dress for the NEXT 4th of July!

Here they are finished with 12 hours to spare! Izzy wanted a shirt so we scored one for her at the thrift. She was a bit perturbed when she saw Tess' dress. She said she didn't know it was gonna look this cute!


Start by buying a T-shirt that will fit your child (or yourself!). One that is medium weight is best. I was thinking of just buying Hanes T-shirts but they would be too thin. I found a long sleeved one that was perfect for Tessa. The length and weight were just right so we snapped it up. It doesn't matter if you get a long or short sleeved because you are going to cut them off anyway.

Shall we have a look-e-loo at how to do? (I usually say "here's the skinny on how it got done" but I am feeling bloated at the moment therefore it called for a name change...)

What you need:
medium weight T-shirt
pencil
pins
elastic
thread
cording/ribbon for drawstring
scissors
sewing machine
dye if  you wish to dye your dress
sequins fit you need to cover up an epic failure in the dying episode of this tutorial.....just wait.......

 I forgot to take a before picture so as I had to put back the piece I had just cut to show you the "shirt"! You will want to try the shirt on inside out so you can draw your lines exactly where you want them. I had to pin up the shoulders about an inch on each side to make it fit Tess correctly. Then I drew my lines.

 On the back, draw a line straight across just above the bottom of the shoulder blades. 
Cut along this line like above. 

On the front while it is still on your little person, draw lines from their armpit to the collar band like above.

 Cut along those lines, cutting off the collar and arms. It should look like this when finished.


I needed to practice my elastic sewing before I attempted to do it on the real thing. I tired just sewing it inside the material and then I tried it folded over like a casing but sewn in. I liked the finished look of the fold over so that is how I did it.


Measure your elastic to be about 3.5" shorter than your finished width. 


With your dress still inside out, pin it on each end and in the middle of the back. Don't worry about the extra fabric because you are going to pull it as you sew it.
Place your dress like so under the presser foot and change your stitch to zigzag. Just cover your elastic with the material.

Stretch the elastic and your material and start to sew. Keep the material pulled taut and just go slow. The machine will gather it as it goes.


When working with knit, it does not unravel so you can just fold it over one time. Most other materials you would need to fold it over once, and then again to make the raw edges disappear. So fold over the sides of the front of the dress and sew a straight stitch from top to where it meets the elastic in the back. 

Now fold the top collar edge over about 1/2" and sew a straight stitch. You are forming a casing for your cord to go through and that cord will gather the neck a bit.

 Because I was going to dye the top red, I wanted a red cord. Measured a length on Tess and then cut it and threaded it throughout the casing. At this point try it on, because the back was still a bit baggy so I just took it in a bit in the side seams under her arms. Then it fit much better.

Okay, now the epic fail began and lasted about 4 hours.  So I wanted to dye them to be red, white, and blue. An obvious color combo for the 4th right?  But I wasn't sure if we were going up to my In-laws to stay over night before the 4th, so I had to get these done like yesterday because I wouldn't be able to do any of this at her house. (Just so you do not think I am a complete moron, I have dyed things before but it has always been in it's entirety and always successfully. If I had planned better..... I would have dyed one color one day and the other the next day so I could leave them in the dye bath for a good 30 minutes. Or I would have figured out that I could just put the buckets next to each other and let each end in the dye for the 30 minutes. But when you are trying to do too many things at once, logic seems to go out the window.)

Got my RIT, got the hot water going, and started dipping. One end in blue. Gorgeous! Wrap it in a plastic bag and dip the other end in red. More Gorgeousness!! Wrap it in a bag to let the dye sit. Such deep dark beautiful colors were emerging. Set the timer and potted some plants and came back to rinse. I knew the red might bleed during the rinse so I rinsed that first. Not terrible but a little pink. Then I rinsed the blue and it was fine. Hung it on the line to dry a bit before popping it in the dryer to set.

Does the word leave things better off mean anything to y'all? Apparently I have never heard this phrase because I started to try and fix the "pink"and the death spiral into dying hell began.

Thought I'd just oh, so carefully brush on a bit of Clorox with a small paintbrush and it did miraculously remove the pink.....as it was seeping into the red and the blue. I did not notice this until I hung it on the line to dry a bit more. Then I started to notice that I had not been as careful as I thought on Izzy's shirt and I had a few small drips of Clorox in the blue! AHHH! But it was a deep navy blue and I had a dark navy blue Sharpie! Ah Hah! I can fix this problem. I'll just color it in and no one will be the wiser. It looked great all colored in.

Time to throw it in the dryer to set the dye! 30 minutes later out they came! Faded as all get out! and it looked like a two year old had colored on the bottom with an electric blue Sharpie! Now I really was at a total loss for how to fix this. The girls were looking forward to wearing matching outfits and if I hemmed it then there would be hardy any blue (now looking more purple than blue) showing. What am I gonna do at 9:30pm before the 4th?

You betcha! Bedazzle them! Look closely under the large star to see my amazing DIY handiwork! Impressive isn't it?

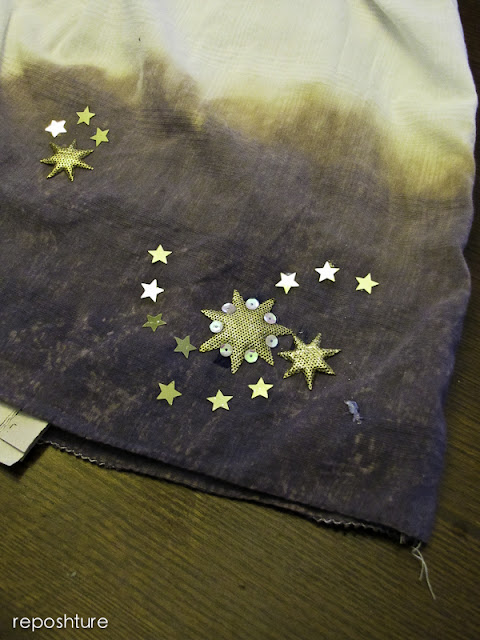
Thank goodness by girls like a little blingy-bling! 

 So we bedazzled Tessa's as well even though I had not attacked her dress with a sharpie. She deserves some sparkle. She certainly gives enough of it off!
 Put some sequins up on the bodice so it looked like I "meant" to add the sequins and stars everywhere.


Thought I'd give you a shot of the back of the halter dress and see where else I had to bedazzle on Izzy's. What a wreck! But they L.O.V.E.D. them and that is all that matters in the end.

Truthfully, I am not sure I needed to add any sparkle to these dresses. No one would have been able to take their eyes off of these beauties.


I think I should stick to painting furniture and just sewing. That and the Sharpies have been hidden from me by my husband at my request.


Always being renewed,


Please see the link party page to see where I link arms with those blissfully beautiful bloggers that host every week. So gracious they are along with these other sweet ladies! Todays Creative Blog vif187 all crafts Homemade Projects ~ Add Yours! {5/1} Home Stories A2Z  
We Would Love For You To Join Us Each Wednesday... 

My Repurposed Life My Uncommon Slice of Suburbia

Visit thecsiproject.com


July 8, 2012

Living Room Help

Please ,Oh wise readers, can you please help me with my Living Room?


It is lovely to live in a house that is over 100 years old. I love the charm and the wood work and the high ceilings. What I do NOT like is that I do not have a whole wall to speak off! I either have a fireplace, radiator, door or window on every wall! Oh and I hate my couches too! So I need your help. I am tired of the arrangement that we have had for about 8 years!! I know that is shameful for me to admit. I have tried many arrangements and it always has to go back to the original because my TV was chained to one corner due to the Direct TV wire etc.  but we just switched to cable and I got the cable guy to leave like 20 feet of extra cable!!!! Woo Hoo! So I decided to try and re-arrange but I don't think I like it 100%.  Here are a few before looks:


 View from the Dining Room


 View from the Foyer


 View from the Fireplace looking into the Foyer


View from the radiator looking into my Dining Room
See? NO UNINTERRUPTED WALLS!

Okay so this is what I came up with. I apologize if this is less than inspiring!
 Switcheroo of the TV to the radiator wall and put everything on an angle. 

 I kinda hate that I have to decorate around the TV and the giant sofa. I think next time I will purchase a love seat and two chairs. Looking for something a little retro....

 Notice the strategically placed bug jar? It just works in this space!

 My Ski Pole Lamp had an Olympic Sized accident in the form of a 13 year old with sized 9 Mens shoes tripping over it two days into its glory.  So until I can get to it to fix for real it is being held together with tape and embroidery hoops in true DIY style!


 Not sure I like the angle. Leaves that area behind it looking very wonky and empty. I did find two lamps at the local thrift store and will add those later so that should help take up some visual bleakness.

Wait till you see 'em! Huge! and Genie Bottle like! and Delicious!


Okay, so now you got the tour. Any advice would be helpful and appreciated. 

And obviously necessary......

Always being renewed,


July 2, 2012

Vintage 70's Bar Cart


Just finished working on this beauty. I like clean lines and color so this cart was super fun to do.
My sweet neighbor was having a yard sale and she let me peek before the sale. How cool is she??
Super Cool! Plus she makes the most amazing cookies and baked goods you will ever savor. I say savor because you don't just eat her cookies, you sayyyyyyyy-vor them.

So I scored this little cart from her lickety split and got to work on her pronto.
 Any wonder why my husband has taken to calling me Sanford? Keep looking all around the yard....


Ready for some happy color fun?
 It's like sunshine! That's the thing about color. If you are afraid of doing color on your walls, just add it using things like this. It makes your house more interesting and fun to move around in. And since my motto is ice is too short NOT to live in color, this yellow totally fits the bill.
I wanted to paint some cool graphic blue stripes on the shelves but then thought against it. Once you start adding your bar stuff or kitchen gadgets, it would just be covered up and look busy. So I thought simple was best.

Sorry, the vintage bar accouterments are not included. I got all of these at various yard sales/thrift stores etc. The little plate actually has 50's style salad recipes on it! How cool is that!

I think it's groovy.

Was I wrong to keep it simple? Or should I have added the stripes?

Always being renewed,

LinkWithin

Related Posts Plugin for WordPress, Blogger...