Here is a picture of the before and after and then I'll get to the skinny on how to make these.
So my creative process is usually get something done quickly even though I know that it is not quite finished and then at a later date, go back and get it done. These curtains are a perfect example of that.
I wanted, and needed curtains up asap, once the LR was done being painted for my husbands sanity. He does not like the neighborhood in our hood so to speak.
So I got the fringy curtains up in a day and they have stayed that way for about 4 months. Some of that is you just have to be in the right frame of mind to tackle this because the panels are so large and you know it is going to be a boat load of work .
I haven't been in that frame of mind until Sunday! My girls were going to spend most of the day with Granny so it was an ideal time to get the painting party started.
My process has been processing for the entire 4 months as I have been playing around with every idea under the sun to make these curtains look less boring.
Want to come on the journey into the reaches of my mind and dust off some cobwebs with me, as we go through the about 15 ideas I had before settling on "THE ONE"?
Great! I'll pack some sandwiches!
I had experimented with "the-dying them" in a tealy-blue because I have several teal accents around the LR but I hadn't gotten the rug yet so I knew I needed to be patient and get the rug and then see how I needed to attack the curtain issue.
I really did love this idea though and I might use it to make some pillows.
looks kinda Ikatty
Then I thought sharpie pens would be the way to go and practiced a bit on a scrap piece of drop cloth. ALWAYS practice first to see if you like what you are doing.
Nope
Not this either.
I went online to search for stencils but I really didn't want to wait for the stencil to arrive. Once I decide to do something, I go into overdrive and am usually not willing to wait. I also knew I might not have another day for a while where I didn't have the kids running around while I tried to paint. So I needed to figure something out and quick!
Okay, now came the idea of stamping my curtains and small diamond sponge stamp was born. See the practice stamps on top of this? Yes always practicing before the real deal. I loved this idea but the IDEA of pressing this over and over and over, about a million times was reason enough for me to nix. this until I decided maybe the right thing to do was to go BIG!
So I went BIG and made my own stamp.
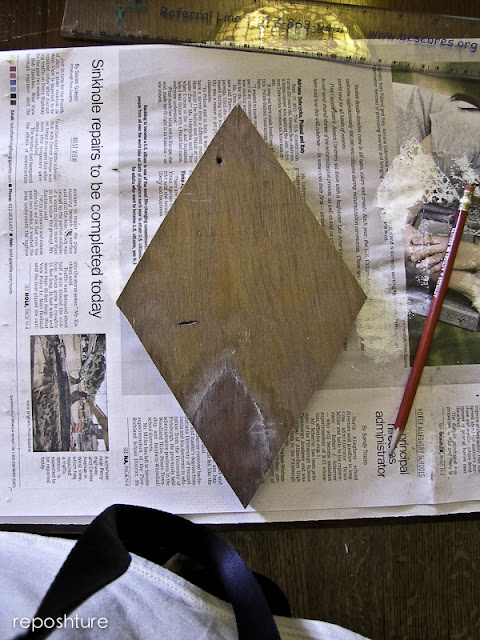
I got some scrap plywood and divided it in half both ways with a pencil
Then I drew a line from the line on the side to the line on top to create a diamond.
I cut it out using a circular saw. The lines on the back will help you keep your stamp straight vertically and horizontally so make sure you glue your sponge to the side that is blank. The plywood helps to give even pressure when you go to stamp the curtains and it is easier to grip.
Here are a few more attempts that went wrong. Fun Foam as a stamp. Not so fun.
Drop cloth also not a good medium to stamp. I finally bought two Mr. Clean Mop heads and glued them together and cut them into a diamond shape with rounded corners. The Mr. Clean sponges are a better choice then cellulose sponges because the holes are very small so you get a better finished stamp.
My final stamp.
It took me about 2 precious hours to get to this point!
I layed out some of that adhesive backed floor protecting plastic and got to work.
As with most things I do, I just eye-balled the placement and started stamping. I started in the middle and worked out to either side for the first row and then just went in between for the next row and so on. Once each row was done, I stamped the sides.
I used regular latex paint in a color called Polished Pearl that I had laying around. I thinned it quite a bit and used a small roller to roll it on the sponge and then stamped it on the curtain. In case you are wondering why I have napkins under the side stamps it was to blot the paint from the fringes so they stay, well, fringy.
Since I was short on time and I wanted to get all four curtain panels done before the hubs and girls got home, I was a tornado of stamping and rolling madness. I got the smaller panels done in 30 minutes each. I was sweating and my legs were aching because I had the paint pan on the floor and then kneeled down to do the stamp. Up, Down, Up Down.....butt burning! I actually counted this as exercise for the day. Is that lame?
Because the paint was thinned it dried fairly quickly and after about a 15 minute wait, I was able to re-hang the curtains so they could dry completely.
At this point, I thought I should just wait until tomorrow to do the big dogs because my back and just about everything else was hurting. But then I looked at these and just wanted to be done already.
After two panels I finally got wise and put the paint pan on a table and stepped on the stamp to apply the stamp!! So much easier and faster and a better stamp actually. I mean it's getting 135 lbs of pressure! It better look good.
These took about an hour each to complete.....and then I fell into bed.
I woke up the next day and was unable to walk up and down stairs! My left leg was so sore. I could not believe how much of a work out I had given my body. Definitely not lame!
ANd neither are these curtains! The went from blah to Kablammity Blam!
I love the white on beige because it gives it a subtle pattern and the curtains will change with my LR as it evolves. Because you know it will. I think that is why the black sharpie wasn't floatin' my boat. Too in your face.
subtle was the way to go.
Just so you know it is Wednesday and I am finally able to walk again.
Beauty has it's challenges.
Always being renewed,


They turned out great, Kim!
ReplyDeletea subtle but definitely fun change!
ReplyDeleteI can't tell you how much I love your curtains. I have a stencil that I think I'll use to do mine cause I'm too lazy to make the stamp. I really love how the cream color looks on the drop cloth, perfect image and so soft. You did such a great job, thanks for suffering to show rest of us how to do it. Think I'll use the color of my quilt for the color of the stencil, will do it kinda lightly so it's not in our faces.
ReplyDeleteI do many of my crafts on our little kitchen island, (probably why there's paint on the cupboards and the tile floor). If I need to measure/cut/pin a bigger piece of fabric I take it in on our king sized bed. Don't think I'd better do the painting on the bed tho.
Been wanting to make winter curtains for our room and think these will be just what I've been wanting. It gets pretty cold in winter here and need heavier curtains to help keep room warmer. I'll most likely line them also. Thanks again for the inspiration, was what I needed. Happy summer
Thank you so much for the sweet dialogue! I hope you get started asap so you can enjoy them asap!
DeleteHi Kim,
ReplyDeleteI really adore your curtains. The final result is too beautiful, and thanks for sharing the process! It is quite inspiring. :)
Cheers!
Dorothee
I would never have thought of this, but they are really wonderful, and add a lot of interest to your room!!
ReplyDeleteI hate when DIY reminds me that I'm not as young as I used to be. lol These look amazing, Kim! Great idea and tutorial! Love them!
ReplyDeleteI am seriously in love with these! The final product is just too beautiful (and these would cost a fortune outside the DIY!) You've also got loads of other great ideas too! I actually really love the ikat looking one. I think I'll try that and your final method. You're amazing!
ReplyDeleteXO