
Pretty soon the Pope is going to make a home visit and present me with a supeana to search my house for any other churchy like objects that I might not yet have had the opportunity to mar.
Here is the evidence....

And here are the accomplices....

a bottle of Holy Water (juuuuust kidding), Krylon Looking Glass spray paint, Rustoleum Oil-rubbed Bronze spray paint, 320 grit sand paper, and a paper towel
You already know my MO: Find a religious object and use it for parts! I am like a Chop Shop for Relics! Oh, I can't take the guilt.
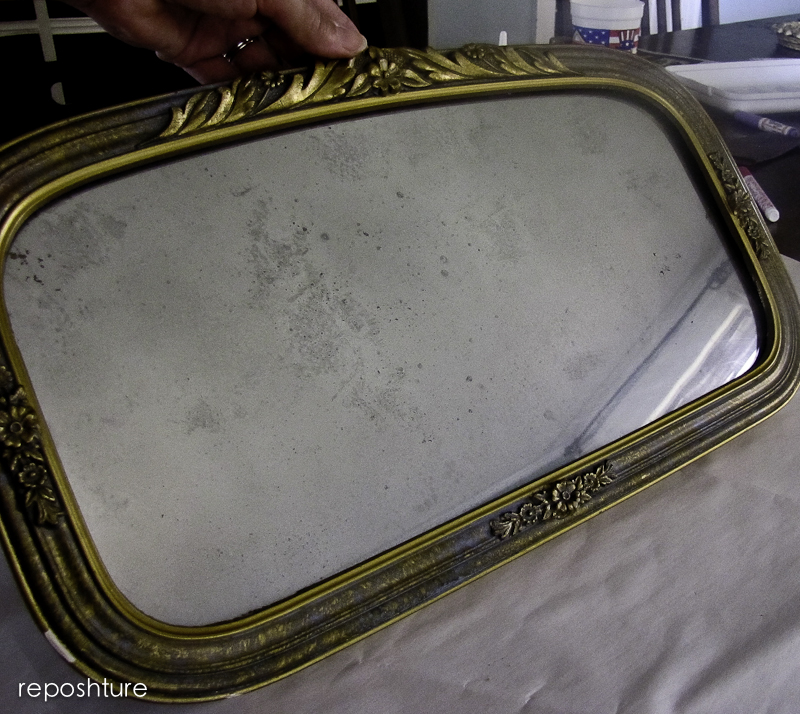
So I am going to confess how I did the dirty deed. Found the Last Supper print and frame at the Goodwill today for $7.95. The frame is awesome but I needed it to be a mirror and an old, vintagey one at that.
I removed the Last supper print and gently placed it in the trash can face up. I had to return and turn it upside down to hide Christ and all the apostles faces.
Then I got to work on my glass.

Spray one thin coat of the Krylon Looking Glass mirror Spray paint on the BACK of the glass
Spray the glass lightly with water
Second coat with the mirror paint
Dab with a paper towel
Sand in a few places lightly
Add 3rd coat of mirror paint
Spray again with water
Spray Oil-rubbed bronze spray paint. Make sure it spits and doesn't spray. Do this by using short bursts.
Add 4th coat of mirror paint
Dab lightly
The above picture is the back of the glass
Here is the front!

I know these photos are a bit dark but I do not know how to photograph mirrors and this was the only way I could edit them to show how it turned out.

I think by layering the mirror glass in between the aging layers is what gives it the right look. I don't think I would have gotten what I wanted if I had done all of the mirror layers and then sanded etc. And you need that first layer of mirror glass before you spray with water so you get more depth as well.

It looks just like another mirror I have that is about 75 years old so I will be using this technique again I am sure.
Just hopefully not on anything holy for a while.
Don't Forget to check out the Communion Table Shelf and enter to win one of two! The giveaway ends August 28th
Always being renewed,

Please see the link party page to see where I link arms with those blissfully beautiful bloggers that host every week. So gracious they are along with these other sweet ladies!


Kim you are hysterical!! I have laughed until my tummy hurt! Then I pinned this because it's awesome! Love the technique and the tips. Thanks for sharing this. I will pray for your eternal soul and in the meantime...maybe you better head to the confessional!
ReplyDeleteKim, what are we going to do with you!! You really shouldn't have put the picture in the trash. Next time, put it in the trunk of your car, and when you go back to Goodwill, take it in and donate it!!!! Then it is THEIR problem.
ReplyDeleteLove how the mirror turned out. Blessings. (just in case!)
AWEsome great tutorial gonna pin it.
ReplyDeleteRaNae
I love this! I think that ORB will give the added depth needed to make the looking glass more authentic-looking. You never cease to impress. :)
ReplyDelete-Revi
That looks awesome! I am pretty sure even the Pope would approve! As far as I am concerned you have made the world a better place by removing an eyesore and replacing it with something beautiful :)
ReplyDeleteI have a can of the mirror paint awaiting just the right moment, and this will be so helpful. Thanks. Lori (hometalk)
ReplyDeleteWho knew there was such a thing as mirror paint? Add this project to the list that taunts me everyday!
ReplyDeleteSon't worry Susan- it is always there but the kids won't be so leave the laundry and enjoy those sweet babies. Give all of them a rasberry kiss on their lovely round bellies for me!XOXO
DeleteWhen I could finally stop laughing, I was dazzled by this amazing faux finish!
ReplyDeleteI've never heard of mirror paint! AWESOME! :D
ReplyDeleteThat turned out very well! Thanks for sharing the technique.
ReplyDeleteVisiting from My 1929 Charmer Sunday Best! Love this!! I've done acid mirrors and faux mercury glass but didn't know a big piece of could look so good. I have all the accomplices out in the garage and a spectacular shield-shaped frame. Oh boy! Here I go!
ReplyDeleteI keep finging out about these cool products out there I never knew about. I love how it made it look vintage and it really looks good. Thanks for letting us know about his product, and so happy you ended up with it looking so pretty. Thanks for sharing your creative inspiration with Sunday’s Best – you helped make the party a success!
ReplyDeleteLOL - you're too funny - what a beautiful transformation - I just love it!
ReplyDeleteHugs,
Suzan
This technique really turned out great. I pinned this, 'cause it really DOES look old!
ReplyDeleteGreat mirror. I have the looking glass paint and need to try an aged look like yours.
ReplyDeleteYou're Hiliarious... and Hopefully not going to Hell... *Winks* Great Tutorial... but I doubt I'd have the Relic Chop Shop in me... so I'll just have to find something else I can deface without huge amounts of Guilt and feeling Sinful?!? *Smiles* But I totally understand why Relic Frames are the best Candidates... they are always so Awesome huh? *LOL*
ReplyDeleteI just had some feedback that was a little creeped out by my Altered Art Photo Shopping of an Ouija Board on my Fall Blog Banner... so perhaps I'm going to Hell too, I dunno?!? *Winks* Spritz me with some of that Holy Water as a Safeguard, 'kay... *Juuuuuuuuuuuuust kidding... better make that clear lest I start getting peeps assuming I'm a Hellbound Heathen!!!*
Blessings from the Arizona Desert... Dawn... The Bohemian
Seriously stunning transformation! Thanks for the tutorial; I'm going to be looking for something just like this to make into a mirror.
ReplyDeleteJill @ http://junkyvagabond.blogspot.com
I love the way this turned out! It definitely looks vintage. I have never been able to find that Looking Glass Mirror Spray.
ReplyDeleteI think that Jesus would understand. Especially since it wasn't a high quality print in a fab mirror. Love the after. Thanks for sharing on Tout It Tuesday. Hope to see you tomorrow!
ReplyDeleteI think it turned out amazing~ awesome job!! Thanks for linking up at Feathered Nest Friday1 :)
ReplyDeleteThis definitely looks better as a mirror. That being said, I recently picked up a print "The Head of Christ". I was going to make it a chalkboard by painting over the back of the cardboard. When my niece stopped by for a short visit, she couldn't believe what I was doing. She said it would look great in her dining room. So, I felt good about it. I couldn't paint over it, or throw it away.
ReplyDeletegreat job!
gail
OMG - I have that same exact print/frame. I bought it many years ago for the frame. Even though I am a lapsed Catholic, those nuns must have really done a job on me, because I have been unable to get myself to get rid of the picture.
ReplyDeleteThanks to you, I am now ready to take the plunge (and possible long exile to purgatory)and re-purpose the frame! - Paul
Thank you for sharing these great techniques. I will definitely try it out on my framed mirror
ReplyDeleteI stumbled upon this tutorial on Pinterest....Thank you! I laughed out loud at your description of the defacing of the picture. Lovely tutorial and lovely writing...kudos!
ReplyDeleteI have a question or two. Does the sanding give texture? Allow for more of the bronze paint to show through? And, secondly, I can see how the water would soften or blur, but then do you keep applying the following layers before it dries? Thank you!
ReplyDeletethe sanding allows it to look like the mirror finish has worn away like it does on old mirrors. And yes I applied the next few layers with the water still there so paint does not adhere in those spots. again, it adds to the aged look.
Delete