November 22, 2011

Baby Picture Nursery Border

So here is another idea, you can see another one here, on how to make a unique baby picture display for your nursery.

Our old nursery had a dropped ceiling and textured walls. When we took the ceiling down, there was nothing wrong with the ceiling but it did leave a design dilemma.  Do we texture the rest of the walls up to the ceiling or leave it as is? Since I was in no mood for more work, "leave it alone" became my mantra, along with "I need more chocolate, NOW!"

We painted the ceiling yellow and the walls a sage green because back then no one found out what was cookin' in the oven, so neutral colors it was.

As much as I liked the color scheme, I did not like that the walls looked unfinished with the two colors. But baby #1 was born and it stayed like this for a while.......then one night while nursing him in a blurry fog I came up with an idea.

Blurry, sleep deprived fogs are sometimes when inspiration strikes apparently. I mean, your mind is free to wander wherever as you try to keep from dropping the baby from your lap and/or drooling on the poor thing as your mouth lays gaping open. And forget the whole changing the diaper at 3am. I am surprised my children survived the first year.

So, as I was gazing at the ceiling trying to stay awake, I must have thought, "why not make a border out of all the baby pictures I take!"  I could not possibly afford all of the albums it would take to house all of the pictures I had taken and I like to look at them and smile so this is how it went down, or up as is the case here.

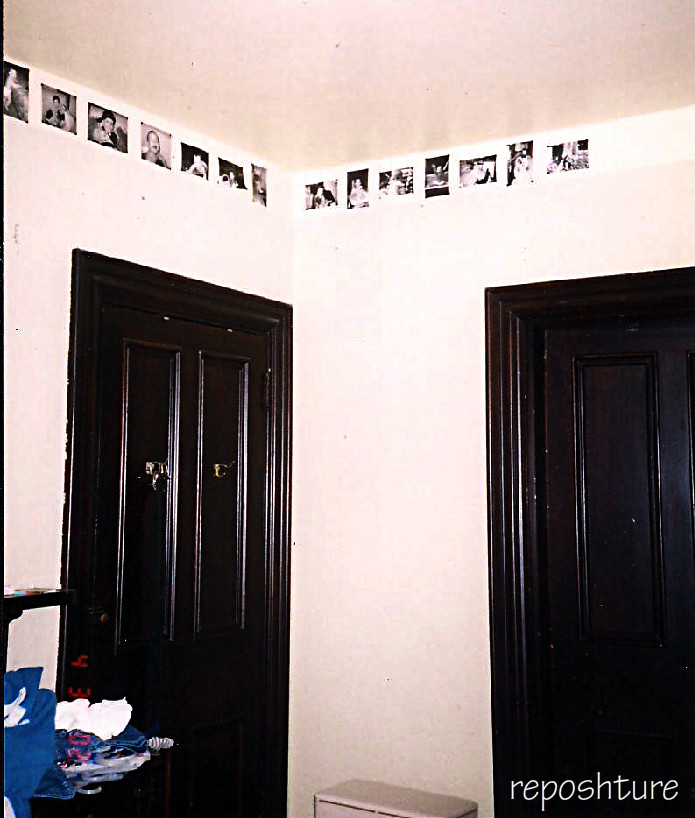
These pictures are from 2002 and I had to scan them in so I apologize that the quality is not good but it will give you the idea.

Actually if you look real close, it was exactly 4/30/2002. So now if someone asks, I can say I know exactly one thing I was doing on that date. Taking a picture of  pictures. Sounds odd but that is my life.


I went through all of the pictures I had taken thus far and chose a mix of horizontal and vertical as it looks a bit better to me.


The idea is that there will be a progression in age as you add more pictures. So as your baby grows so does your border. Kinda cool.

Just an FYI, after you fill your four walls, your baby continues to grow.  Your on your own for figuring out how to document from there on.


After I picked the pictures that I wanted, I copied them at Kinkos into black and white. I love B&W photos and it really made it look more uniform than the color photos. But do what you like, it's your nursery!

I originally decoupaged the first 3 photos to the wall and then realized, "what happens if we move?!?" Which seems to be our modus operandi , as soon as we get the house how we want, we move. Any body else smellin' what I'm cookin'?

So....

 I bought those little black picture mounting corners and put them on the corners of the remaining pics. And added them to the first three decoupaged pics for continuity's sake.


I layed them out on the floor to see how I wanted them and the just started hanging.  
Every time I would walk in the room or pass it in the hallway, I'd have to stop and take a look. The pictures just made me smile.

And that is a good thing.

What do you think?

Always being renewed,


Linking to:

November 18, 2011

In Honor of Babies!

My sweet friend Sara just had a baby girl. Harper. She is a little peanut of a thing and just too cute. Well, with Baby Jesus' birthday around the corner  and the arival of Harper, it got my thinker thinkin'. I love celebrating babies and everything about them but I am not much of a scrap booker. But I am a memory maker. So I thought I'd share some clever ways I have saved typical baby stuff but put it on display instead of in a box. I mean who really wants to look at a box when you can look at a baby!

So check back regularly as I am going to post several cool ways to display locks of hair, a cool ornament, and a really cool border that will grow up with them!

First up, Baby cards!

These are so stinkin' cute that I really did not want to just put these in "The Box".
So first you have to do the unthinkable....... cut them up. Breathe into a paper bag if it helps.

Cut out all the cute phrases, pictures, cartoon characters. Crumble up some tissue paper, spread flat again  and wrap around a mat. Tape to the back to secure.  Arrange all the cut outs around the mat and glue in place once you have them the way you like them. Put in that cute baby face and fall in love all over again.


Did the same thing for when he was 1! The numbered cards really help identify the year.  


What a quick year it was.....he's 12 now. Sigh.

Do you have clever ways yo have displayed baby cards? Please leave a comment so others can enjoy as well.


Always being renewed,

November 15, 2011

What a Croc!

 Blogging has really opened up a whole new world (cue Aladdin music) and I feel very fortunate to have "met" so many cool chicks. Savannah is one of them. She is from Los Angeles and she designs SHOES!!! Love her already!Well she saw my Toile Tables in my Etsy shop while searching for something totally different. Isn't it fun when people are brought together.  She asked me if I could change out the fabric as the Toile would not work in the room she wanted them for. I am always up for a challenge so bring it on.  Don't worry, no little croc had to die for these tables to live a new life. Here they are in all their modern chicness. And a how-to too.


Mod Podge really is a good glue. It was a bear getting the fabric off (lots of animals in this post somehow).
Use it to measure the new fabric and cut. Try to match up the design so the tops of the tables match.
Dry fit it like you did with the Toile and then get your tools. I did not want to glue the fabric down like I did before because the croc was a bit thicker and it would not have looked finished.  
So upholstery tacks to the rescue.  You will want to get a rubber mallet so that you do not damage the finish on the tacks. After putting in one whole side of tacks on the table, I was not seeing the tacks as such a good idea! And I had to take them out several times to make them straight. Not an easy task.
This is how you should remove a tack if you ever need to! Yes that is a fork. And a napkin. Very high level tools every DIYer should have in their tool box.  The napkin is so when you leverage the fork, you do not dent the edge of the table.

Plan B. Upholstery tack strip. AHHHHH, no one makes it in Black!!!!!

Plan C. Spray paint antique trim.
Works like a charm! And the finish is much more durable I must say then the original tacks!


Original way I tried to spray, kept curling up soooo,

Cut to length and then spray. Much Better. When I say cut to length, you will need to use sharp pliers and cut right next to the open hole. The individual tack that you use in the hole will cover the edge.

I know this picture is horrible but I wanted to show you the tack strip up close so you can see how it should work.


Spray the tacks that come with it.

You nail these in every 5th space. Because the hole will not always line up with your edge you will need to have an open space as close to the end as possible and then fill in with individual tacks.


What do  you think? Do Crocs Rules?


Always being renewed,

Linking to these creative hostesses:The Shabby NestFeathered Nest FridayRedoux{Primp}With A Shot Of Brandy

November 13, 2011

Toile Table Tutorial

My Toile Tables seems to inspire alliteration.

Deborah from upcyclingmylife wanted to know how I did the fabric insert on these tables so today you get to find out and hopefully, you'll find some cool way to use fabric on your furniture as well. It is super easy.


Here they are finished

Cut your fabric to be smidge, and I mean a smidge, smaller than the area you want to cover. When you smooth it out it will go to the edge of where you need to be. I was lucky and just used the veneer insert as my template

Dry fit the fabric. This means check the fit and placement BEFORE you start gluing and sealing. You'll be glad you did.

Don't worry about any threads right now. It will be better to cut them when the glue has been applied. And never pull! It will fray your fabric edge and look messy.

Now get your Mod Podge and a foam brush. I like foam because it doesn't leave brush marks on the finished product.

 Tape off the edges you do not want to be sealed. It will protect it from getting the glue on it. I know this isn't pictured but trust me. It is worth it. Mod Podge the entire surface. Then lay half the fabric like above, once placed correctly....
slowly lower the other half in place. Smooth out all air bubbles. Move slowly because every time you reposition your fabric, you will pull it out of shape slightly so take it slow. The directions on the bottle say to Mod Podge the fabric before placing it on the wood but I think it works out better this way. Let the glue dry first before starting to add your layers of Mod Podge over the fabric. If you don't you will move the fabric a bit.

The Mod Podge is cloudy when wet and clear when dry. It takes about 10-20 minutes for each layer to dry. I sealed the fabric with 4 layers of Mod Podge. Make sure you brush the sealer on in BOTH directions. That way you hit all the fibers well.  At this point you can cut any threads that peek out from the edges. I also added a bit more sealer to the edges to make sure it adhered well and didn't lift over time. 

The fabric will now feel VERY rough. Take 180 grit sandpaper and sand it a bit once you are happy with how it looks or you are tired of gluing, which ever comes first. This will make it feel very smooth and finished.  You can also give it a light sanding in between layers of sealer but I did not.


Now you have Totally Terrific Toile Tables!


Tune in next week because I had a buyer in LA who purchased these tables but wanted a different  fabric insert. I can't wait to show you how these went from French Chic to Modern Chic with just a switch in fabric! Somewhere a faux crocodile is crying.......


Always being renewed,

November 12, 2011

My Makeover

I don't think I have ever done two posts in one day but in the spirit of my latest re-do post, I though I'd reveal  MY makeover. I was scared at first to let my hairdresser have at it but I was pretty sure I could trust her. I wasn't sure about the makeup part (she is a little on the young side) but that is washable. So here it is, I hope you are as stunned, and as thrilled, as I was when I looked in the mirror.....


Who knew lip pencil could double as an eyebrow pencil. Watch out, we started a  new trend. You can say you saw it here first!


The artist at work

Once again, the safety net is it is washable

Always being made over,

LinkWithin

Related Posts Plugin for WordPress, Blogger...